Showing posts with label artist book. Show all posts

Monday, October 22, 2012

Wedding Guest Book

With the great response to my previous Wedding Guest Book post here is another guest book created for my nephew and fiancee's upcoming wedding (yes, my sister has two kids getting married within 3 months of each other). I hope you are inspired to make a guest book using whatever paper, cardstock and dies you might have on hand.  Making every page different was so much fun.  Can't wait for another family member to get married so I have an excuse to make another.

Again, I printed all the papers using digital scrapbooking files onto a slightly textured sketching paper which I trimmed down to 8 1/2 x 11 so I could run them through my laser printer.  The papers were then trimmed to 8 x 8.  The cover papers were printed onto sticky-backed label paper which I adhered to recycled card from a ceral box and also sized to 8 x 8.  All the matte board used was saved from a framer's garbage bin; the coloured cardstock were offcuts from a paper distributer's garbage bin.


For the bride and groom's names on the cover, I printed brown lettering on a beige background onto cardstock.   The font for the names is Scriptina, a free font from the internet.  The frame was cut using a rusty ochre matte board.  I used the Tim Holtz Ornamental die for the outside and the Tim Holtz Mini Ticket Set die for the inside.  I then embossed the frame with a Cuttlebug embossing folder and added some distress ink to the edges.


For the first inside page, I printed brown text on a pink background onto cardstock.  The frame was cut from maroon matte board using the Sizzix Frame die.  I embossed the frame with the same Cuttlebug embossing folder as used on the cover. The flower was made using the Tim Holze Mini Tattered Floral Set and the Tim Holtz Tattered Flower Garland.  The bottom and top petal layers were cut from paper, while the middle layer was cut from the same maroon matte board as the frame.  I attached the flower using foam dots to add some dimension.


For some of the pages I added photos of the couple (which were happily supplied by my sister) printed onto cardstock behind small frames.  For the top photo frame I cut maroon matte board using the Tim HoltzTag and Bookplate die.  For the bottom photo frame I cut white matte board with a added top layer of maroon tissue paper using the Sizzix Heart and Wing Set. The wings were cut from off-white paper using the Sizzix Heart and Wing Set.  The wings were glued to the page while the heart was attached with foam dots to add some dimension.


For this page, I added a "card".  The outer side of the card was cut from beige cardstock using the Sizzix basic Pop 'n Cut die without the insert.  I used a Tim Holtz On The Edge die on the bottom edge.  When I folded the card I offset from the middle to allow the inner card edge to show a little.  I added distress ink to the edges to give an antique feel.  The leaf that keeps the "card" closed is cut from matte board using the Sizzix Leaves die.  I then added distressed ink to its edges.  I used a brass brad to attach it to the paper with a cardboard "washer" in between to allow the leaf to turn.


For the inside of the "card", I cut some brown cardstock using the Sizzix basic Pop 'n Cut die centering the heart from the Sizzix Heart and Wing Set die inside the magnetic opening.  I then cut the center portion again from some contrasting paper and sandwiched a photo of the couple in between.  (This is the only paper that I didn't print; it was left over from another project where I used a sheet of Sara Fera designer series scrapbookking paper from K & Company.)  I used a Tim Holtz On The Edge die on the top edge of the card.  The top heart is cut from the Sizzix Heart and Wing Set die using the same paper but for the an inner piece I used a solid pink.  This was attached with foam dots.  The bottom hearts were also cut from the Sizzix Heart and Wing Set die.  The outer heart frame was glued to the card while the smaller heart was attached with foam dots.  Note that because I offset the front piece of the card that some of the beige shows at the bottom. I guess I could add text here later.


For this page, the photo frame is cut from maroon matte board using one of the Tim Holtz Styled Labels and then cut again with the Sizzix Flower Layers #3.  Then I embossed with a Craft Concepts embossing folder.


The photo frame for this page is cut from yellow matte board using the Tim Holtz Tag and Bookplates die.  I added distress ink to match the colour of the flourishes.


There are about 10 pages that do not contain photoframes.  These I left for guests to sign and write their wishes. Because some of the pages are quite dimensional, I added smaller embellishments to these pages to even out the whole guest book.  The top page includes a gold matte board leaf cut using the Tim Holtz Tattered Leaves die as well as smaller leaves cut from scrap paper using the Tim Holtz Autumn Gatherings die.  The flower on the lower page contains flower layers cut from paper using the Sizzix Flower Layers #3 die and the Tim Holtz Tattered Flower Garland.  This flower was attached with foam dots. Note that the location of this flower hides the brass brad from the leaf closure for the "card" on the reverse page.


Two more guest signing pages.  The top has a left over inner heart cut from matte board using the Sizzix Heart and Wings Set die.  To add something different I cut two strips of pink card with scallops using a Tim Holtz On the Edge die and added them to the right bottom corner.  The lower page has an embellishment from gold matte board cut with the Tim Holtz Mini Florish die.


Once all the pages were assembled, I bound the 8 x 8 book with my Rubicoil binder with a white spiral binding.

Wednesday, October 17, 2012

Ashwin Accordian Album

Little Ashwin hit 1 month and learnt how to smile.  I wanted to mark this momentus occasion. I watched a video by Karen Burniston using a Sizzix die to make a 3-D accordian flip album.  I was not sure whether I wanted to buy this die so I made one without the die.  

As with all their dies, when you are viewing information about this die on the Sizzix website you can see a sample photograph of something made with the die and usually a line drawing of the die blades.  I followed the line drawing to make this card.  Still not sure if I want to buy this die, but it should be noted that what took me at least 5 hours to make could have been made in under half an hour if I used the die.


My accordian album is 5"x5". The pages use coordinating digital scrapbookking papers printed onto cardstock (if I had to do it again I would print the cardstock on both sides).  This is the front.  The letters were cut using the Tim Holtz Word Play die using scrap matte board which I then coloured using some Tim Holtz distress ink.  I added a felt/wood embellishment of a star with a rocking horse as Ashwin translates to "star" in Sanskrit (trust these young folk to give their kids exotic names).


The accordian album is rather nifty as it folds down flat enough to slip into an envelope, yet opens to quite an impressive size. You can make your album any number of pages; I chose 4.


On the internal pages I added photos of little Ashwin's smiling face which I printed onto cardstock.  The frames were cut using 2 different sizes of Sizzix Bracket Window dies using a blue cardstock.

Wednesday, August 29, 2012

Wedding Guest Book

Inspired by Sizzix and Jonathan Fong, I made a wedding guest book for my niece's upcoming wedding. I printed all the papers using digital scrapbooking files, onto a slightly textured light sketching paper which I trimmed down to 8-1/2x11 and ran through a laser printer.  The papers were then trimmed to 8x8.  The cover papers were printed on sticky-backed label paper which I adhered to a recycled cereal box also sized to 8x8.  All the matte board used was saved from a framer's garbage bin.


For the bride and groom's names on he cover, I matched the colours of the cover and printed brown lettering onto a light blue background.  The font for the names is Scriptina, a free font from the internet.  The frame was cut using a maroon matte board .  I first used the Tim Holtz Ornamental die, then cut out the inside using the Mini Tickets Set.  I then embossed the frame with a Cuttlebug flourish folder.


For the front inside page I printed black text onto a tourquise background onto card stock.  The frame was cut using the Sizzix Frame die.  I embossed the frame with the same Cuttlebug embossing folder and added some distress ink to the raised areas.  I added a die cut of the Tim Holtz Bird Branch behind the frame which I coloured with various colours of distress ink.


For some of the pages I wanted to have photos of the happy couple. 
For this page I started by printing a photo of the happy couple onto card and on the reverse printed a mustard colour similar to one of the colours on the background paper.  I carefully cut the photo using the Sizzix Bag with Scallop die, but instread of folding on the creases to make a bag I folded in half.  I trimmed the bottom edge using a corner round punch.  I then embossed the front and added a light bit of distress ink to the raised areas.  The little leaf that keeps the "card" closed is cut from brown card using the Tim Holtz Autumn Gatherings Sizzlet die.  I used a brad to attach it to the paper with a cardboard "washer" in between to allow the leaf to turn.  The flowers are cut from the Tim Holtz Tattered Flowers die.  The maroon larger flower was cut from card that I printed to match the leaves on the background paper.  The top white flower was embossed with a Sizzix dot embossing folder.  The flowers were attached using foam dots to add some dimension.


Some of the fancier pages. 
For this page I used the Sizzix Flourish die and the Tim Holtz Mini Hearts Set to cut matte board and tried to echo the feel of the background paper.   The hearts were again embossed.  The frame for the photograph was cut using the Tim Holtz Tag and Bookplate die and coloured with distress ink.


The background paper for this page had green birds and branches, so I die cut birds using the Tim Holtz Caged Bird die and embossed.  The birds were cut from card that I printed to match the green in the background paper.  The frame for the photograph was cut using the Tim Holtz Alterations Tag and Bookplate die and coloured with distress ink.


The frame for this photo started with the remaining cut out piece from the cover (Tim Holtz Mini Ticket Set) with an added cut out using the Tim Holtz Mini Hearts Set.  The flowers were cut from card left over from pervious pages and uses the Tim Holtz Tattered Flowers die. The top flower was embossed using a Sizzix dot folder.  The flower was attached using foam dots to add some dimension.

I created about 10 signing pages which were not as embellished as much as the other pages. 
The flowers on the this page were cut using the Tim Holtz Tattered Flowers.  Again I used card that I had printed for previous pages.  The flower was attached using foam dots to add some dimension.


The flowers on this page were cut using the Tim Holtz Tattered Floral Garland Sizzlet die.  The little white flowers were embossed with a Sizzix dot folder. The little green backing for the flowers was the remaining cut out piece from one of the previous photo frames.


Once all the pages were assembled, I bound the 8x8 book with my Rubicoil binder with a white spiral binding.

October 29 update: This post has been so popular, I made another guest book for a nephew.  You can view it in a later post.

Tuesday, February 07, 2006

The Mind Is A Mansion

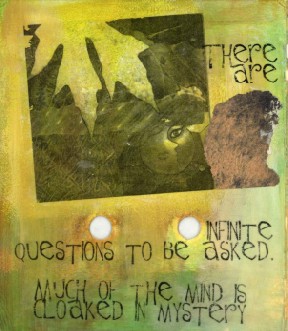
This is page 7 from The Mind Is A Mansion, an altered board book. The original book came with the holes. Background consists of washes of acrylic paint. The black and white text and image are transfers. Image is a black and white laser output of a traditional (non digital) collage onto release paper. Mirror image text is also a laser output to release paper. The transfer itself is accomplished using gel medium.

text for The Mind Is A Mansion:

The mind is a mansion that contains many rooms
Each a compilation described by our thoughts, dreams, emotions, ecstasies,
angers and secrets of our deepest selves.
There is so much that remains unseen
until we unlock the door and look inside.
There are infinite questions to be asked.
Much of the mind is cloaked in mystery
The more we look inside each room
the more we realize
that while these paradoxes and enigmas
are infinitely questioned,
they are forever never answered.